Level 7 - Milestone 2
Milestone 2 - Project Code Structure
This goal of this milestone is to understand the basic structure of a Spring Boot
application.
Before completion of this milestone, students will:
- Have a basic understand of what Spring Boot is
- Learn how to initialize a Spring Boot project
- Understand the 3-tier architecture of a Spring Boot application
- Be introduced to the build.gradle file
- Add dependencies to the build.gradle file for Swagger and Swagger UI
- Be introduced to the application.yml file
- Edit the application.yml file to change the port on which this application runs
Creating the Project with Spring Initializer
The Spring Initializer can be found at start.spring.io. There are a number of fields here that we will need to select values for:
- Project:
- Gradle Project Gradle is a modern build automation tool that allows us to easily retrieve any dependencies our project requires. Why Gradle?
- Less verbose than Maven (which uses XML)
- Faster than Maven (After running the application, the Gradle Daemon runs in the background, allowing subsequent launches to be much faster
- Gradle uses Groovy, a JVM language, in the build file. This allows for much greater flexibility, and even allows us to write custom code in the build file.
- Language:
- Java
- Spring boot:
- Select version 2.5.7
- Project Metadata:
- Group
- Where the project will be hosted. Also infers the root package name to use.
- e.g. org.jointheleague.api.cheetah
- Artifact
- Project coordinates - infers the Name
- e.g. Cheetah Search
- Name
- Display name of the project that also determines the name of your Spring Boot application.
- e.g. Cheetah Search
- Description
- Description of the project
- e.g. A Spring Boot application that uses Library of Congress to return information on books.
- Package name
- The root package of the project
- e.g. org.jointheleague.api.cheetah
- Packaging
- How the project will be packaged
- jar
- Java
- e.g. 11
- Choose the latest Java Long Term Support release
- Dependencies
- Spring Web
- Spring Reactive Web
Finally, click the "Generate Code" button. This will download the start code.
Creating the Repository
Obviously we need to get our code onto GitHub. There is more than one way to accomplish this, but it can be done using the following steps:
- Go to www.github.com/league-level7.
- Create a new repository and name it after the class (e.g. Cheetah-Search)
- Open up the terminal and navigate to the unzipped project directory
- Initialize the directory as a git repository: git init
- Set the remote for this repository, changing the following URL to your repository's URL: git remote add origin https://github.com/league-level7/Cheetah-Search.git
- Add all of the code to the commit, notice the period at the end denoting "all": git add .
- Commit the code: git commit -m "initial"
- Push the code and set the upstream (if you try to just push, you will likely see this suggested): git push --set-upstream origin master
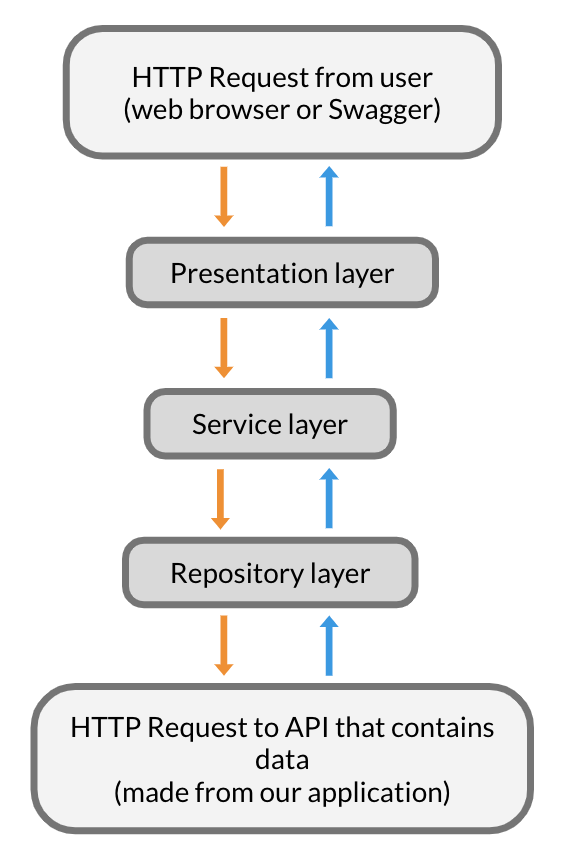
Properly structuring our application makes it easier to understand and maintain. The application can be broken-down into 3 sections, which will each later correspond to a package:
- Presentation Layer
- Service Layer
- Repository Layer
Responsible for mapping request URLs to what should happen when they are hit.
Contains all of the business logic. Any real logic that is need for the application occurs here.
Responsible for retrieving data (from an API or database)
Here is a diagram that represents this structure
The build.gradle File
After putting the code into our IDE, lets examine a couple files that are of special importance to us. The first is the build.gradle file. This file is our build configuration script, and contains much of the information that we entered into the Spring Initializer. You will see information on the group, source compatibility (i.e. java version), and version of the application. As an aside, the "version" is appended to the name of the jar file that is created, and typically the "SNAPSHOT" is removed when the code enters production. You will also notice a section for dependencies. These are the external libraries that we selected in the Spring Initializer which our application will require to run properly. While we are on the topic, there are some additional dependencies we need to add that were not available in the Spring Initializer.
Swagger Dependencies
We need to manually add two dependencies to our build.gradle file, one for Springfox Swagger, and the other for the Springfox Swagger UI. We will use Swagger to document and manually test our application. The most recent versions of these dependencies can be found below: Springfox Swagger 2 Springfox Swagger UI Add these two dependencies to the "dependencies" section of the build.gradle file. For reference, after this step your dependencies should looks something like this (but likely with more recent version of these dependencies):
dependencies {
    implementation 'org.springframework.boot:spring-boot-starter-webflux'
    implementation 'org.springframework.boot:spring-boot-starter-web'
    implementation 'io.springfox:springfox-swagger2:2.9.2'
    implementation 'io.springfox:springfox-swagger-ui:2.9.2'
    testImplementation('org.springframework.boot:spring-boot-starter-test') {
	    exclude group: 'org.junit.vintage', module: 'junit-vintage-engine'
    }
    testImplementation 'io.projectreactor:reactor-test'
}
Note: if you are using the current version of IntelliJ, you will need to click on the Gradle elephant icon that will appear near the top right of the window in order to apply the new dependencies.
The application.yml File
The other important configuration file is the application.yml file. This is the configuration file for the application itself. The spring initializer provides this file to us as "application.properties", but many people find a YAML format easier to read and less verbose. Simply rename the "application.properties" file to "application.yml". While we won't have much need to alter this file for this project, there are quite a few things that can be configured through this file. For now, lets change the port on which this application will run.
Changing the Application Port
First, lets run the application. Near the top of the log you should see a line that looks like this:
2021-01-17 16:01:37.002 INFO 65912 --- [ main] o.s.b.w.embedded.tomcat.TomcatWebServer : Tomcat initialized with port(s): 8080 (http)This shows us that our application is currently running on port 8080. While that is fine, there are a number of reasons we may want to change that. If we need to run multiple applications on our computer at once, we can't have them all running on the same port. Also, when hosting the application, the hosting provider may require that the application run on a certain port. AWS Elastic Beanstalk, for example, requires that applications run on port 5000. As an exercise, and in preparation for ultimately hosting the application, let's change the port of our application to "5000". In the application.yml file, add the following lines. Note that the indentation of "port" is important here:
server:
    port: 5000
If you did not rename the file to "application.yml", you will encounter some problems at this step. Rerun the application,
and you should notice that the line we examined above now says something like this:
2021-01-17 16:01:37.002 INFO 65912 --- [ main] o.s.b.w.embedded.tomcat.TomcatWebServer : Tomcat initialized with port(s): 5000 (http)
Summary of Code Changes for this Milestone
-
Cheetah-Search
- src
- main
- java
- org.jointheleague.level7.cheetah
- resources
- build.gradle